How to Play One Video Across a Presentation
A video can be one of the easiest parts of a presentation to disrupt. For seamless video integration for presentations, place the video on the slide where it should begin and set it to continue playing as you advance through the slides.
It’s natural to expect a clip to play smoothly from start to finish, but playback can depend on the file format, codec, and presentation setup. A video that works on your computer may still need preparation before it’s ready for a live presentation.
This guide explains how to keep a video playing as slides advance, choose compatible formats and codecs, and insert a local video file. You’ll also learn how to prepare the clip and test playback so the transition feels cohesive, whether you’re presenting from your own device or coordinating video for a corporate event.
Table of Contents
Playing one video across a presentation
For seamless video integration for presentations, plan playback, accessibility, and sharing together. These steps help keep a clip coordinated as the slides advance.
Add captions or subtitles so viewers can follow spoken content without audio. Provide a transcript when it helps audiences review the material, and consider audio description for important visual information. For U.S. presentations, use videos you created or have permission to show. Review the terms for online videos before including or sharing them.
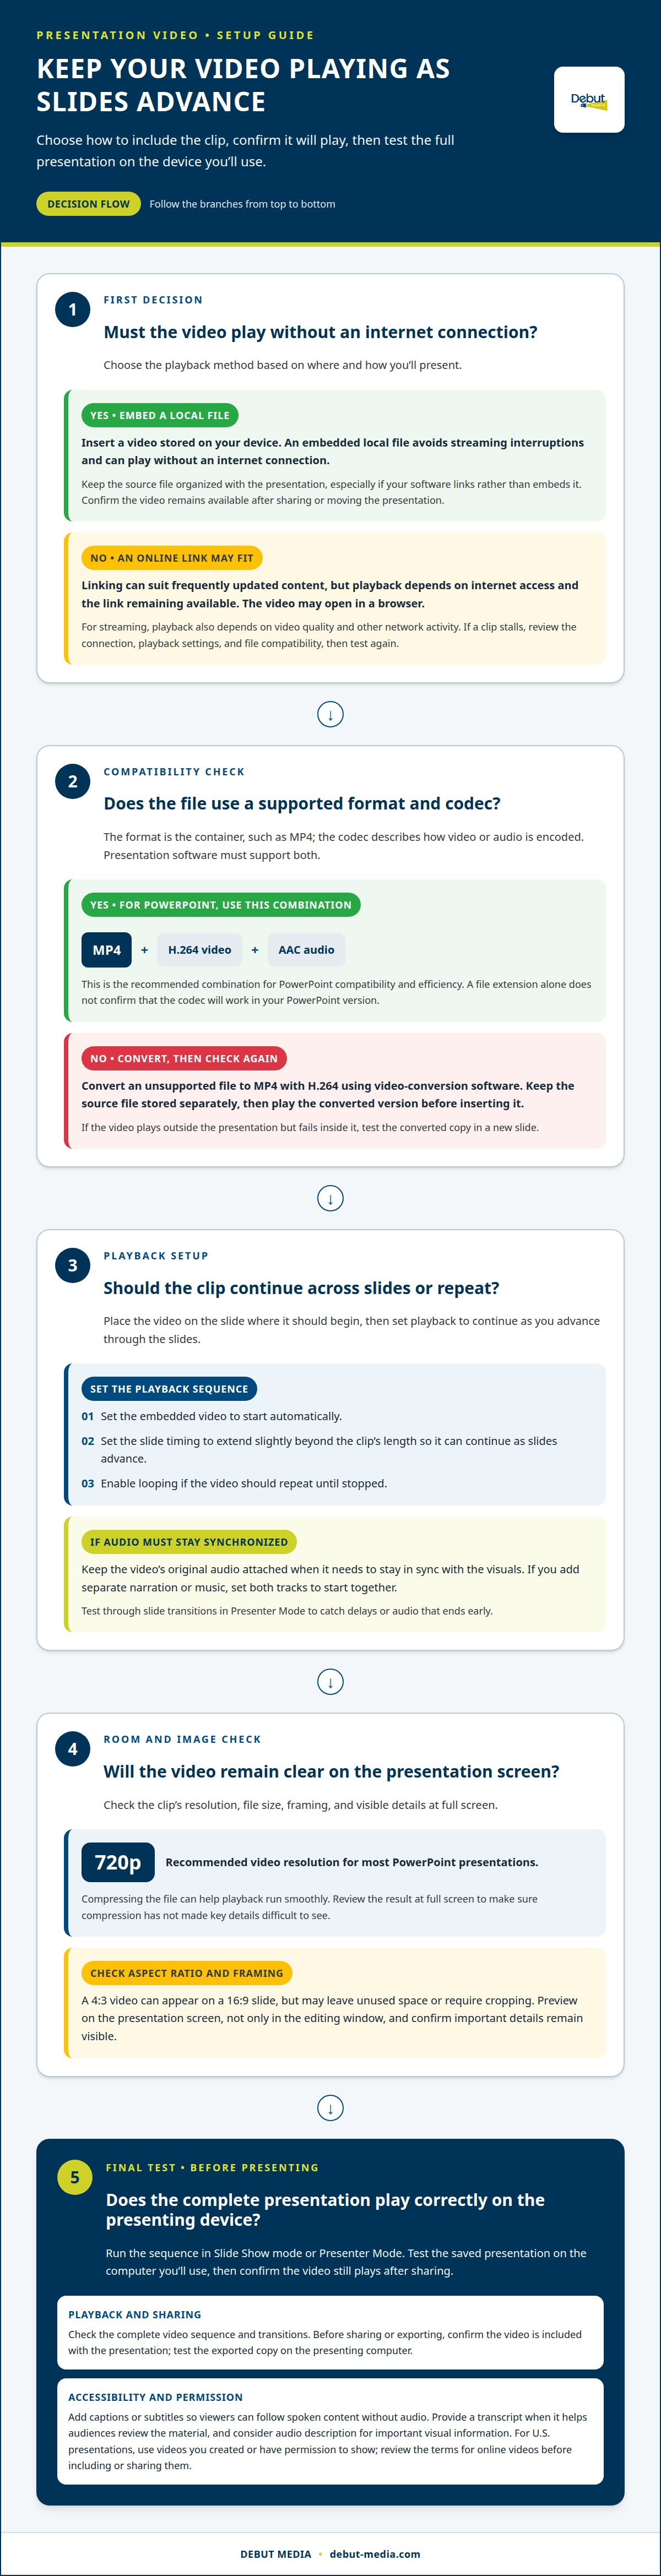
Set Videos to Play Automatically and LoopSelect the embedded video and set it to start automatically. To keep it playing as slides advance, set the slide timing to extend slightly beyond the clip’s length. Enable looping if the video should repeat until stopped. Test the sequence in Slide Show mode, and don’t rely on a thumbnail or separate browser window to trigger playback.
Keep Embedded Videos and Audio in SyncKeep the video’s original audio attached when its sound needs to stay synchronized with the visuals. If you add separate narration or music, set both tracks to start together, then test them through transitions in Presenter Mode. This can reveal delays or audio that ends early, helping ensure seamless video integration for presentations.
For streaming, playback depends on internet stability, video quality, and other network activity. An embedded local file avoids streaming interruptions. If a clip stalls, review the connection, playback settings, and file compatibility, then test again. Before sharing or exporting, confirm the video is included with the presentation, then test the exported copy on the presenting computer.
Supported video file formats and codecs
Check the format and codec before inserting a clip. The format is the container, such as MP4; the codec describes how video or audio is encoded. Presentation software must support both for reliable playback. A file extension alone doesn’t tell you whether its codec will work in your version of PowerPoint.
Choose MP4 with H.264 video and AAC audio for PowerPoint compatibility and efficiency. These settings give the video and sound a widely supported combination. If you’re preparing video in PowerPoint, export or transform the original into this combination before adding it to your slides.
Convert an unsupported file to MP4 with H.264 using video-conversion software. Keep the source file stored separately, then play the converted version before inserting it. If the video plays outside the presentation but fails inside it, test the converted copy in a new slide.
Set resolution and file size for the room and playback device. For most PowerPoint presentations, 720p video resolution is recommended. Compressing the file can help playback run smoothly; review the result at full screen to make sure compression hasn’t made key details difficult to see.
Download an authorized local copy when you need playback without streaming, then insert that file on the slide where it should begin. Test the full presentation on the device you’ll use to present. Confirm the video remains available after sharing or moving the presentation file.
Inserting local videos
Choose between embedding a local file and linking to an online video. Then insert it in PowerPoint and check how it appears on screen.
Choose Between Embedding and LinkingEmbed a video file from your computer when you need playback without an internet connection. A link to an online video points the presentation to content hosted elsewhere, so playback depends on internet access and the link remaining available. Linking can suit frequently updated content, but the video may open in a browser. Choose the approach based on where and how you’ll present.
Insert a Local VideoIn PowerPoint, choose the option to insert a video from your computer, then select the stored video file. Place the video on the slide where it belongs and resize it using the corner handles. The thumbnail should show the intended visual, not a blank frame. Keep the source file organized with the presentation, especially if your software links rather than embeds it.
Preview the video on the presentation screen, not only in the editing window. Check that important details remain visible when the image fills the slide; a 4:3 video can appear on a 16:9 slide, but may leave unused space or require cropping. For an engaging tutorial, check that text and demonstrations remain easy to follow at full screen. Test the saved presentation on the computer you’ll use, then confirm that the video still plays after sharing. This catches missing-file issues before the audience sees the slides.
Debut Media: Video Displays for Presentations & Keynotes
Debut Media provides video displays for presentations and keynotes, helping corporate event teams share presentation content with their audience. Its audio visual services can bring the video setup together with the sound, lighting, and other production needs of a corporate event.
For a conference or keynote, Debut Media’s projector and screen rentals support projection, while its corporate event production services cover broader audiovisual needs. The right setup depends on the venue, viewing conditions, and how the video fits into the presentation. Share those details when requesting a quote so the equipment and production approach can be tailored to your event.
Contact Debut Media AV and Production to discuss video display and audiovisual needs for your presentation.
Plan Your Next Presentation with Confidence
Planning seamless video integration for presentations means thinking beyond the file. Consider how the video supports the speaker, fits the room layout, and appears to the audience. A well-planned setup makes each visual feel intentional and keeps attention on the message, not the equipment.
For an upcoming corporate event in Raleigh, Durham, or Chapel Hill, bring the details together early. The presentation format, venue, and desired viewing experience can shape the audiovisual approach. A clear plan gives the technical setup a defined role and helps the presentation feel cohesive from opening remarks to closing slides.
Your next presentation can make its message clear and memorable. Take the next step when you’re ready.
Frequently Asked Questions
What video formats and codecs work best for presentations?
For PowerPoint, use an MP4 file with H.264 video and AAC audio. This combination supports both the visual track and sound in a single file. Before presenting, test the file in the exact presentation software and on the computer you’ll use. That catches compatibility issues caused by differences between playback environments.